AG DOK - Arbeitsgemeinschaft Dokumentarfilm e.V.
Schweizer Straße 6
D-60594 Frankfurt am Main
Telefon: +49 69 623 700
Spezial
AG DOK-BVK CAMERA TEST 2019
CAMERAS WITH FULL FRAME SENSORS
vom 05.06.2019
Kristina Kozlova (model)
Christopher Rowe BVK (DoP, planing, article)
Felix Trolldenier AG DOK (DIT, colorist, analysis, article, planing)
Rasmus Sievers AG DOK (operator, planing, article)
Erik Wittbusch AG DOK (DIT, operator, planing)
Anne Misselwitz AG DOK (operator)
Gerd Breiter AG DOK (operator)
Steph Ketelhut AG DOK (operator)
Colin Elves (operator)
Robert Löved von Slashcam (operator)
Jonas Spähinghaus (assistant)
Eberhard Spreng (set fotos, article)
Shoichi Sano (assistant)
Natalie Pusch AG DOK (assistant)
Tim Haber (assistant)
In cooperation with

Equipment kindly provided by
For our latest test we concentrated on new cameras with full-frame sensors, marketed as "large format" by the manufacturers. We examined how the increase in sensor dimensions affects skin tone reproduction, contrast range and low light capabilities in addition to the foreseeable optical characteristics of a wider field of view. We also looked at the image quality at higher frame rates.
The cameras: Arri Alexa LF, RED Monstro VV, Canon C700 FF, Sony Venice, Kinefinity Mavo LF, Sony A7S II with external recording.
In addition, we once again demonstrated the advantages of the ETTR exposure method and show what lies behind the "LF look".
We shot the following setups:
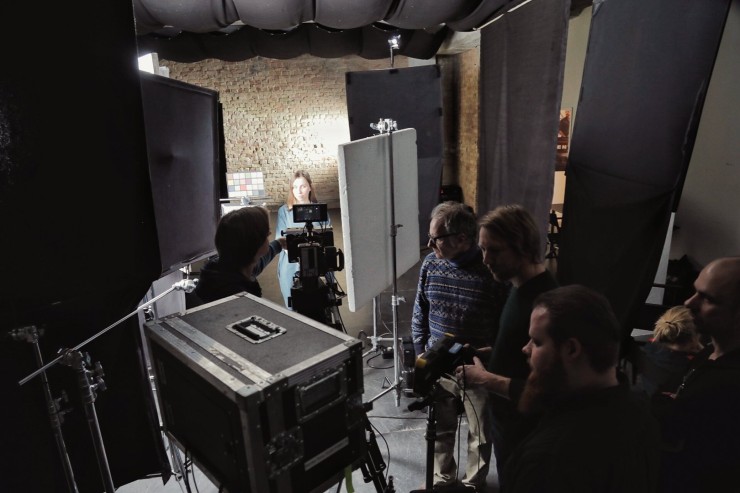
Setup 1: Daylight studio portrait light
Setup 2: Night exterior with available light
Setup 3: Tungsten studio portrait light
Setup 4: Slow motion
CONTENT
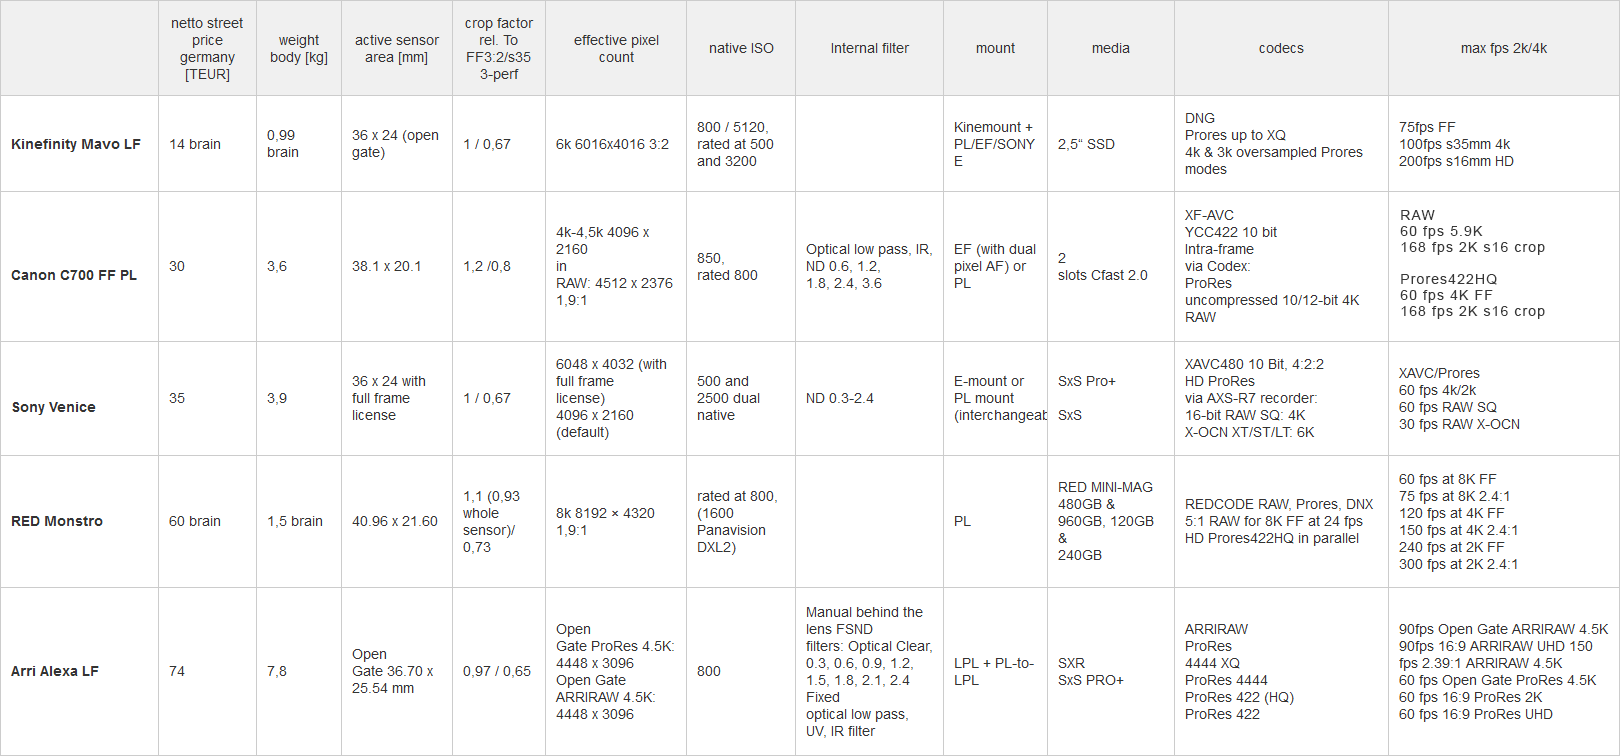
TECHNICAL SPECIFICATIONS
SETUP 1-4
"LF-LOOK"
WORKFLOW
OUR OPINIONS
1s SOURCE MATERIAL
Links to the videos can be found in the relevant sections of the article. Here are all the videos as a playlist:
TECHNICAL SPECIFICATIONS
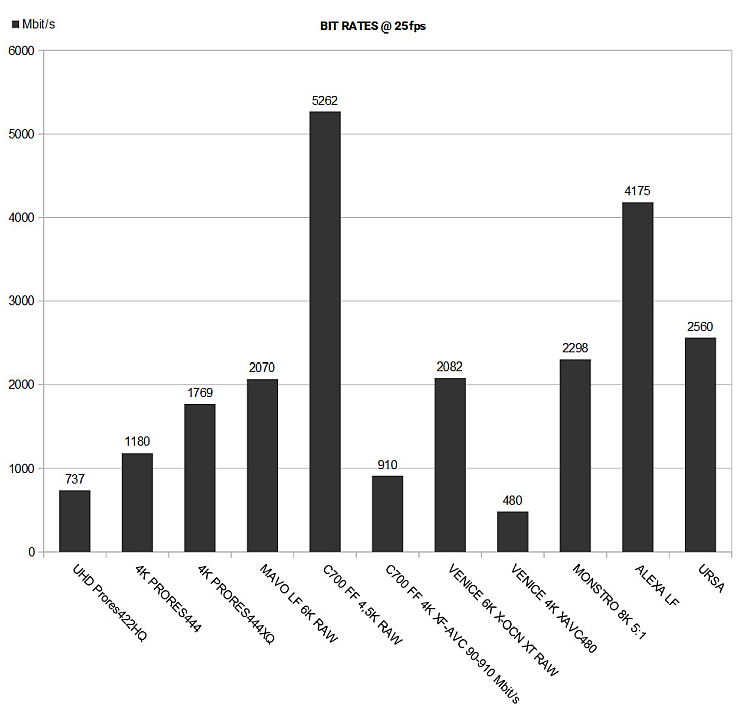
Bitrates of the codecs used in comparison:
Video: Codec-Vergleich
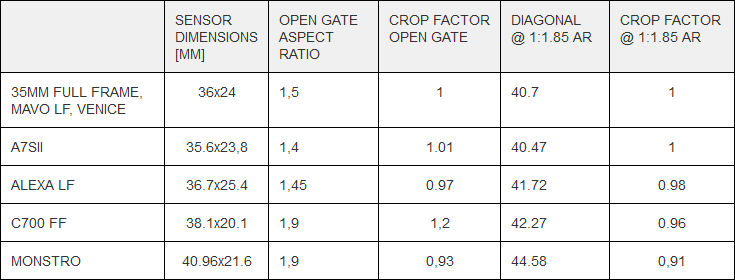
The sensor sizes in comparison:
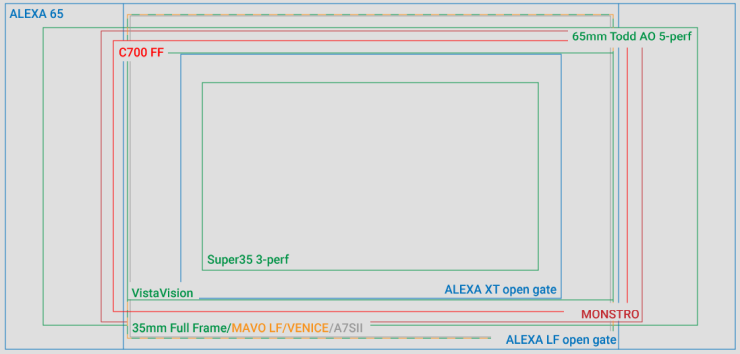
The sensors of the cameras tested vary not only in size but also in aspect ratio. The sensor size and ratio of the Mavo LF, Venice and A7S2 match the 35mm full frame format precisely. The sensor of the Alexa LF is slightly taller, the C700 FF and especially the Monstro are wider than full frame, but not as tall, approximating the S-35 3-perf ratio.
A larger sensor sees a larger image with the same focal length. In order to keep the image section constant (with the same camera position or perspective), a longer focal length is necessary. Multiplication by the format factor (crop factor) results in the new focal length. It is calculated e.g. from the relationship between the diagonals of two formats. 35mm small picture / full format has side lengths of 36x24mm and thus according to Pythagoras a diagonal of 43.27mm.
Using an aspect ratio of 1:1.85, the following format factors apply:
Differences in field of view between the cameras in this test proved to be fairly insignificant. In order to keep the shot size the same in our studio set-up, the difference in distance from the focus plane to the subject only varied by 8cm between the Alexa LF and the Monstro.
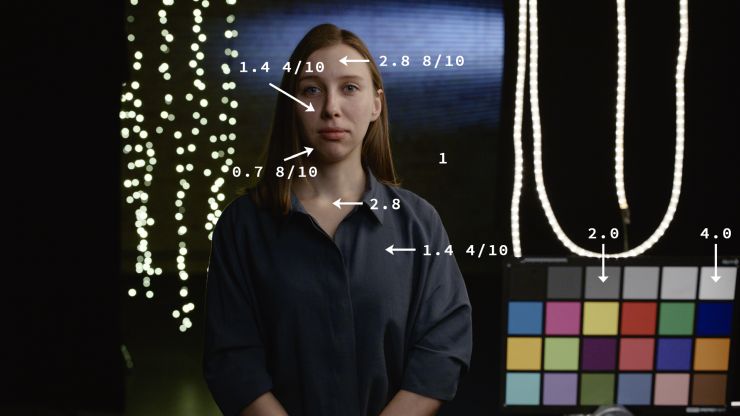
SETUP 1 DAYLIGHT STUDIO PORTRAIT LIGHT
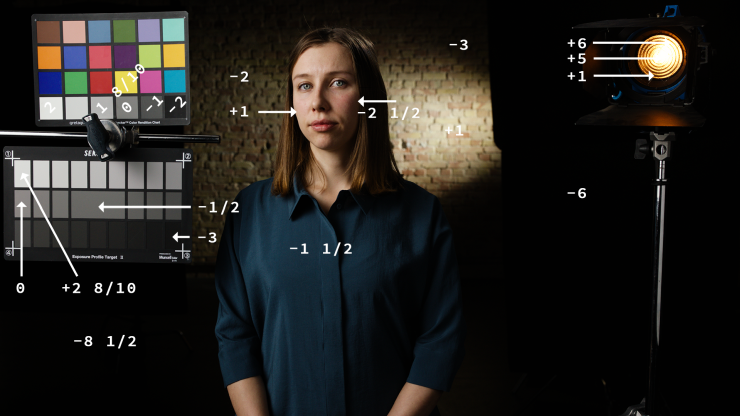
Relative f-stop values
Incident light readings at ISO 800 & 1/50s: Key light: 16, Fill light: 5.6
The key light is a book light: Arri M18 HMI bounced on 1x2m poly and further diffused with a 1x1m full white diffusion (#216) screen. A poly on the fill side kept the 1:8 (3 stops) contrast ratio constant. The kicker and the background light were also HMIs. The lamp in the shot is a dimmed 300W Arri tungsten Fresnel.
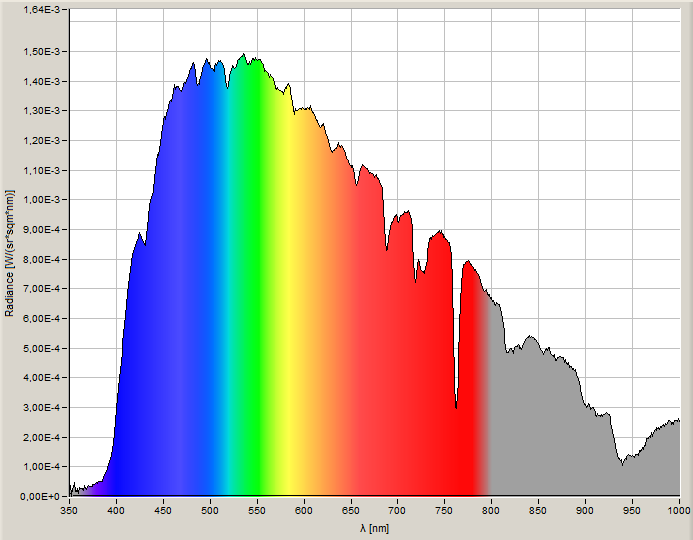
Spectrum measured with Jeti Sepcbos 1211 off a white card: 5550K
In contrast to previous tests, the cameras were not adjusted to the actual color temperature but set to 5600K preset. Exposure levels were bracketed in steps of 1 stop from -6 to +6.
The brightest exposure at which the skin tone in the test subject’s face did not clip was defined as the ETTR exposure (see explanation of the ETTR method in test 2016).
Videos:
ALEXA LF
MONSTRO
VENICE [LOW NATIVE ISO]
VENICE [HIGH NATIVE ISO]
C700 FF
MAVO LF [LOW NATIVE ISO]
MAVO LF [HIGH NATIVE ISO]
A7SII
URSA MINI PRO
Split Screens
ETTR vs Standard exposure
Coincidental same exposures 1
Coincidental same exposures 2
Camera Comparisons
Mavo LF vs Monstro + Noise Reduction
SETUP 2 AVAILABLE LOW LIGHT
Video: AG DOK-BVK CAMERA TEST 2019: SETUP 2 AVAILABLE LOW LIGHT
This was an ad-hoc test shot outside the studio to compare how the cameras perform in a typical city night exterior without additional light. We were particularly interested in the performance of the Dual-ISO cameras.
Unfortunately, the C700 FF is not included here due to an exposure error. Low-light comparisons extracted from Setup 1 (see above) and Setup 3 include the C700 FF.
SETUP 3 LIMITED INCANDESCENT LIGHT
Reflected light meter readings
The key light is a dimmed 1kW RifaLight Softbox, the color temperature is 2400K. It was not possible to position the color chart so that the exposure was the same as for the model, so it received some additional light from an undimmed 300W Fresnel which raised the color temperature slightly. The light on the background is from an unfiltered HMI, the fairy lights on the left of the frame are commercially available "warm white" LEDs with a green cast, on the right is a tungsten light tube.
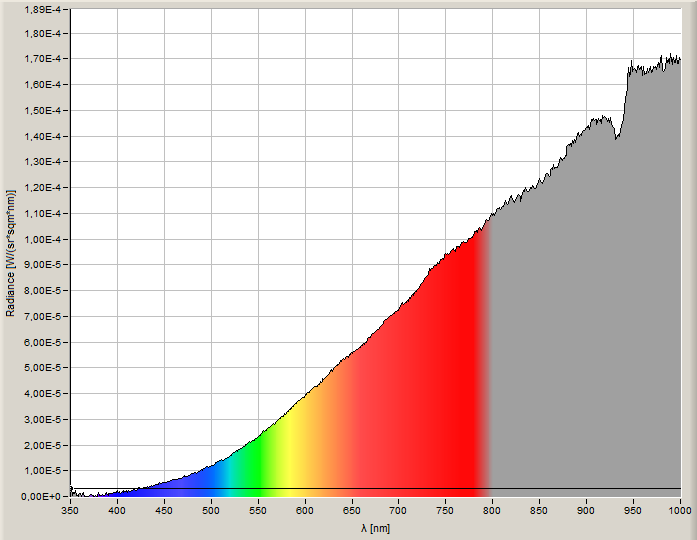
Measurement: guide 125 Lux (EV 8 2/3 = T2.8 at 1/50s & 800 ISO)
Spectrum measured on white card: 2370K
White balance: 3200K Preset
Three typical lighting situations are simulated to test the color rendition of the cameras at low color temperatures and the effect underexposure has on image quality. We were particularly interested in investigating how the cameras with Dual-ISO perform in low-light situations.
The 3 exposure levels were defined as follows:
+/- 0: a typical interior night set-up where the light levels allow a "normal" (not ETTR) exposure.
-2: an "available light" situation such as one might encounter in a typical bar. The available light is below "normal" exposure levels.
-4: an "available light" situation such as one might encounter on a dimly lit city street – the exposure is so low that shooting under these conditions is normally only justified by the content.
For each camera the exposure level was adjusted according to the native ISO specifications of the manufacturer, ie. for the +/- 0 pass the ISO 800 cameras were exposed at 1/50 & T2.8, the Venice (Native ISO 500) and Mavo (rated on the basis of pre-tests at ISO 500 rather that the manufacturer's specification of ISO 800) at 1/30 & T2.8 and the Sony A7SII (native ISO 1600) at 1/100 & T2.8.
For the -2 pass the settings for Alexa LF, Monstro and C700FF were:
ISO 3200, 1/50, T2.8, ND 0.6
The Mavo LF was set to ISO 5000 ISO which automatically activates the dual native ISO setting. Based on observations made in pre-tests we rated this setting at ISO 3200 and exposed accordingly.
On the Sony Venice, the dual native ISO was set to 2500, and the exposure compensated with 1/40 shutter speed.
For the -4 pass the filter was swapped to ND 1.2 instead of 0.6, all other settings remained the same.
In addition, we recorded a -2 pass without compensating the exposure for the ISO setting.
In the case of the Sony A7S previous tests had shown how increasing the ISO value has a positive effect on noise. Using the same settings as the other cameras we increased the ISO to 25,000 on the -2 pass and ISO 100,000 for the -4 pass (effectively overexposing by 1 stop in both cases).
For the Alexa LF, Monstro and Venice the ISO setting has no effect on the RAW recording, the values are only applied to the metadata and viewfinder LUT. For the C700 FF and Mavo LF the ISO setting acts as a pre-gain, amplifying the signal before the RAW data is recorded.
Videos:
AG DOK-BVK CAMERA TEST SETUP 3 LIMITED INCANDESCENT 0 F-STOPS
AG DOK-BVK CAMERA TEST SETUP 3 LIMITED INCANDESCENT -2 F-STOPS
AG DOK-BVK CAMERA TEST SETUP 3 LIMITED INCANDESCENT -4 F-STOPS
AG DOK-BVK CAMERA TEST SETUP 3 LOW LIGHT 1 (selbe Belichtung)
AG DOK-BVK CAMERA TEST SETUP 3 LOW LIGHT 2 (selbe Belichtung)
The best results of the two underexposure levels produce the highest ISO (gain). In RAW, both with "baked-in" ISO and metadata, gain spreads the signal and assigns more data to it. During the grading this helps to separate usable from the noise. The A7SII adds internal noise reduction with increased ISO. White balancing was performed in post using the gray patches on the color chart with the RAW settings and the curves in Scratch. The Master Luma Curve was used to adjust the contrast of the clips and to set the skin tones to a maximum of 80% IRE.
Infrared pollution is probably the cause of varying shades of blue apparent in the subject’s blouse. The Monstro seems to be the least affected by IR pollution.
SETUP 4 HIGH SPEED
Video: AG DOK-BVK CAMERA TEST 2019: SETUP 4 HIGH SPEED 75-240 FPS
High frame rates are often achieved by reducing resolution and effective sensor area. Chromatic aliasing of the water droplets is particularly evident in the Monstro shots. Arri LF can record 4.5K RAW at up to 150fps without any difference in quality. Mavo LF and Monstro achieve higher frame rates, but at lower resolution.
"LF-LOOK"
Some manufacturers succeeded in successfully combining properties such as "3D" or "lifelike" images with "LF" cameras. However, a larger format, even with an equivalent focal length, does not possess such optical properties.
The geometrical description of the Thin Lens explains in first order the relations between format size, format factor, focal length and aperture, here for example the S35 format with a 33mm objective and full frame format with 50mm objective.
We assume here that the goal is to reproduce the identical shot with a different format, i. E. the camera position (perspective) remains the same.
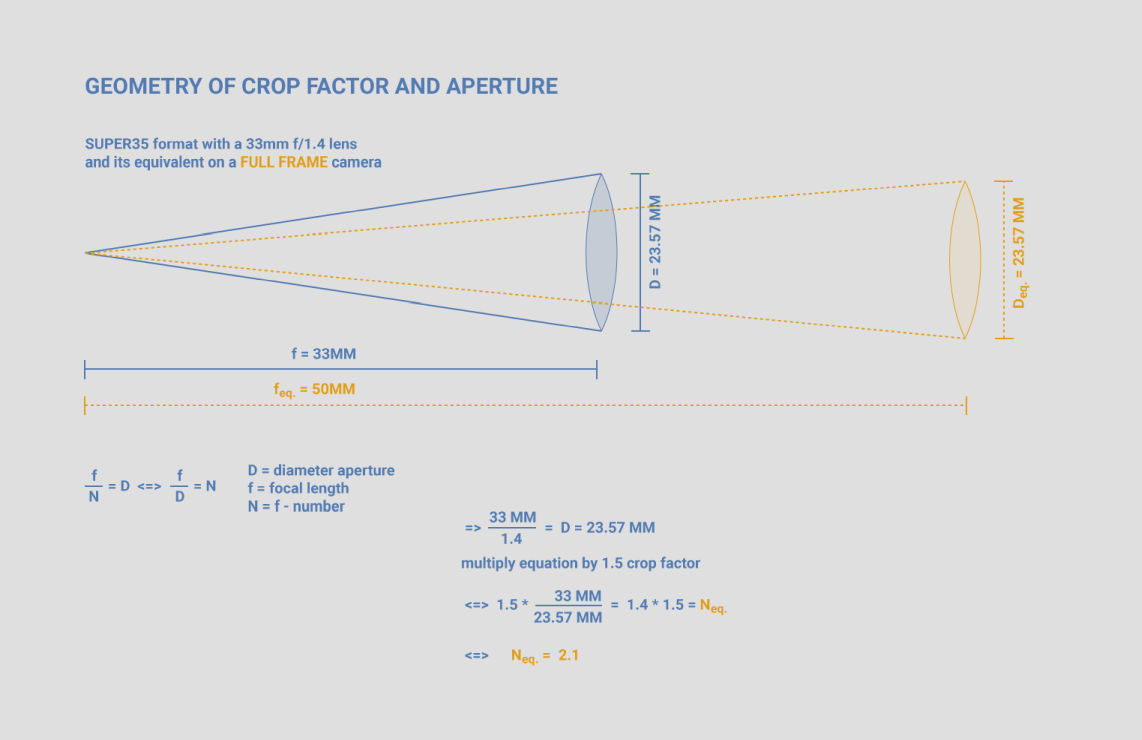

The diagrams show the simple relationships between format sizes, focal length and aperture: If the format is increased, the focal length must also be increased to obtain the same angle of view. This proportional relationship is expressed by the crop factor - the ratio of height, width or diagonal of two formats. In this example the crop factor is 1.5 - A Full Frame camera with a 50mm lens renders an identical shot to a S-35 camera with a 33mm lens.
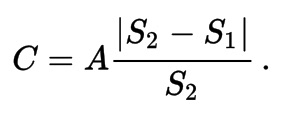
Not only the equivalent focal length but also the equivalent f-number is calculated using the format factor. The goal is to keep the diameter of the blur circles constant in the images of both formats.
The following formula and diagram (source: Wikipedia) describes the diameter C of the blur circle depending only on distances of object (focus) S1, S2 - camera and diameter of the absolute aperture A.
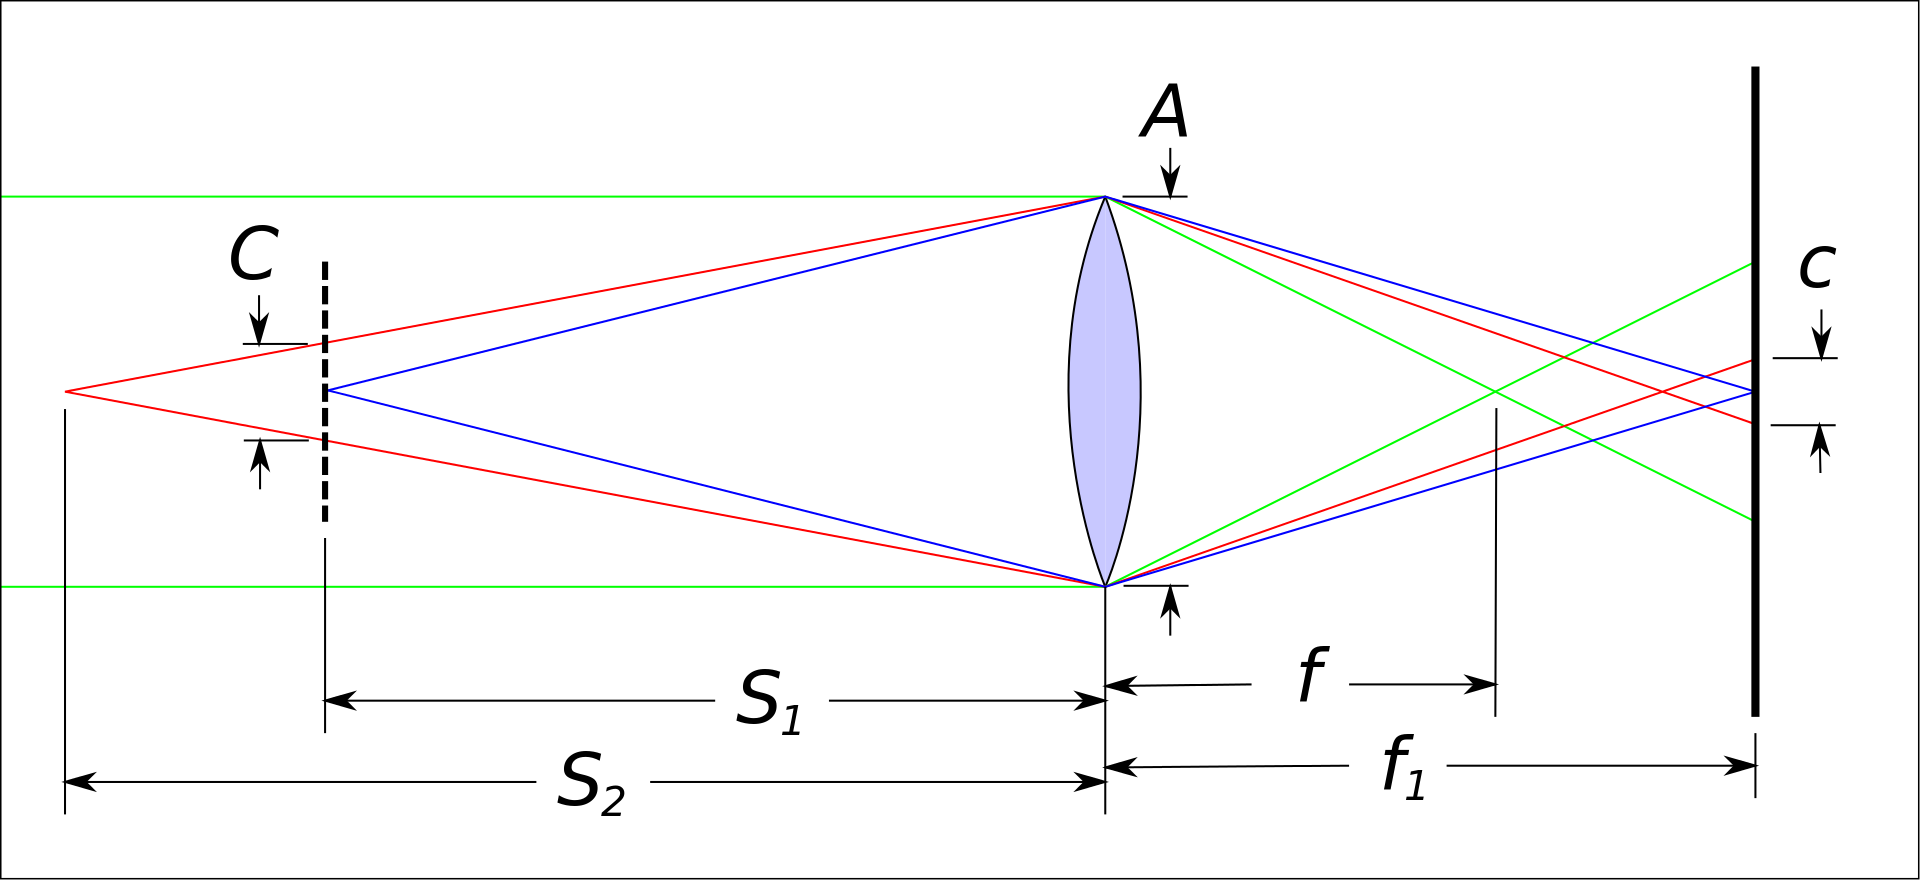
The relative aperture or f-number is proportional to the focal length - determined by the format factor.
So, with a 35mm sensor, you'll gain a little more than an f-stop of blur over the S35 format. In other words - with the (longer) equivalent focal length on the full frame camera, a smaller aperture suffices for the same depth of field. In this example a 2.1 instead of a 1.4.
Two optical characteristics of Full Frame format can be noted:
1. The larger format provides about 1 stop shallower depth of field at the same equivalent focal length and aperture.
2. Maximum apertures of available optics in the market for s35mm and full size are at the same level, so we can conclude that with full frame sensors, it is easier to produce shallow depth of field.
The "LF look" is also associated with "less distortion", a "different rendering of space", more separation in depth and more resolution.
Distortions: There are two types of distortion, optical and perspective distortion.
Optical distortion: barrel and pincushion distortion of lenses can be corrected and depend on the position of the aperture in the optics. By recording a grid a correction file can be created, a process regularly performed for the integration of VFX into live action shots. Lack of distortion does not represent a look that is inherent to "LF", as it can easily be reproduced for smaller formats.
Perspective depends only on the position of the camera.
Perspective distortion is especially noticeable in short-focal length shots, the nose, for example, might appear unnaturally large. This is actually only caused by the small subject-to- camera distance, regardless of format or focal length. The camera renders the image correctly, but the human eye sees the same image differently, processed by the brain to look more natural.
The other extreme is the apparent increase in compression of space behind objects in the foreground. This is not caused by longer focal lengths, but also only by the distance of the camera to the object – in terms of perspective, a crop of a wide-angle shot is identical to a telephoto shot taken from the same position.
Depth separation: This is a function of depth of field. As shown above, it can be enhanced by using a larger sensor size with equivalent focal length at constant aperture and subject-to-camera distance.
Increased spatial resolution: The higher pixel count of a larger sensor may be advantageous, albeit only for oversampled images. Unlike larger film formats, digital cameras with larger sensors do not necessarily offer more resolution (see RED Helium for example) or lower noise.
To summarize: with a constant subject-to-camera distance, the same f-stop, equivalent focal length and circle of confusion the only optical effect caused by the larger format is a reduction in depth of field.
Video: AG DOK-BVK CAMERA TEST 2019: SETUP 1 DYNAMIC RANGE AMIRA VS ALEXA LF
Mehr zu dem Thema von Steve Yedlin ASC.
WORKFLOW
The same lens was used on all takes – a 40mm Sigma FF High Speed Cine Prime. Differences in sensor size we compensated for by adjusting the position of the camera. The stop was T4 or T5.6 for most takes, only opening up to T 1.5 for extreme overexposure and stopping down to T11 for the lowest underexposure levels. The exposure time usually varied between 1/50s and 1/100s, only decreasing to 1/25s for strong overexposure or increasing to 1/400s for the lowest underexposure levels. Internal ND filters were used where available, for Alexa LF, Red Monstro, Mavo LF and Sony A7S Schneider Rhodium FSND filters were used in the strengths 0.6, 1.2 and 1.8. Both the internal filters and the Schneider NDs were shown to have no discernible color cast in a preliminary test.
Grading was done in Assimilate Scratch primarily with the RAW settings, the master luma curve and the manufacturer's LUT with the aim of preserving the character of the color science of each camera. Timelines and exports for vimeo were set to sRGB with a 2.2 gamma.
The Lanczos filter was used for scaling. Material was recorded or debayred with sharpness off and without any noise reduction unless otherwise stated.
OUR OPINIONS
Arri Alexa LF
Although the sensor design remains unchanged since 2010, Arri still offers the largest dynamic range. Colors remain relatively constant over its range. In the warm light of set-up 3 a drift towards yellow was apparent, but this could be corrected in the RAW settings.
The current range of S-35 Alexas with their 3.4K sensors are the de facto industry standard for large productions. They offer sufficient resolution for the big screen and best picture quality overall. The larger sensor of the Alexa LF offers the same picture quality at higher resolution and now exceeds Netflix’ 4K requirement for original productions.
The weakness of the sensor is low light, even at -2 stops underexposure the picture begins to show noise - whether pleasant or "cinematic" is a matter of taste. -4 underexposure cannot be recommended without noise reduction in post. For night photography with available light, Dual-ISO cameras have a clear advantage. The Panasonic Varicam with 2500 Dual-ISO, which stood out under low light conditions in comparison to the Amira in our 2016 test is currently only available with a S-35 sensor.
The camera is very user friendly, anyone who is familiar with the Alexa will immediately feel at home with the menu. The RAW recording works smoothly. The quality of manufacturing is typical for Arri - robust and high quality.
The Alexa LF was the heaviest camera in the test. It sits very well on the shoulder and the well-distributed weight allows for stable hand held operating. A support system is recommended for longer periods of hand held operating.
One negative point was the lack of internal ND filters. Instead, Arri offers a system with which ND filters in one stop increments from 0.3 to 2.4 can be mounted behind the lens. We could not test this system, but it is obvious that a filter change behind the lens is not advisable in a dusty environment and even under optimal conditions is much more time consuming than swapping filters in front of the lens in a matte box.
The Alexa LF Mini was released after our test, it is not only small and lighter, but has internal ND filters just like the Alexa Mini and Amira.
The LF mount should close more tightly. The combination of LF mount and PL-Adapter with two identical locking systems can lead to mistakes. Working with LF mount lenses is not a problem, but when changing PL lenses, the adapter would often come off along with the lens.
Video: Amira vs Alexa LF
RED MONSTRO
A small, lightweight body makes this camera ideal for handheld work, use on gimbals, shooing in small spaces and discreet filming.
The combination of R3D and simultaneous ProRes recording provides a solid workflow for editing. To a certain degree the 8K resolution gives more leeway to rescue underexposed shots with noise reduction.
Handling has improved compared to previous models, but in terms of user friendliness the Monstro is still a mixed bag.
The menu is easy to use but reacts slowly. Changing the WB, ISO, frame rate and shutter speed is easy with the LCD display - once you get used to the menus or the jog wheel. The wide range of slow-motion options (and the speed of changing between them), varying frame sizes and a choice of mounts (EF, Nikon, PL) make the Monstro a very flexible camera.
On the other hand, it has certain disadvantages that limit its applications, especially for documentary work. Shooting in low light requires a different OLPF for optimal skin tones, but swapping it requires sensor recalibration, which takes 15 minutes and is not advisable to do in a dusty environment. Likewise, the need to toggle sensor calibration files when the shutter angle is changed is prone to errors and time consuming.
The lack of internal NDs makes a matte box an essential requirement and swapping external NDs is time consuming. The camera is not designed to facilitate sound recording –no built-in XLRs, poor internal preamps, no audio monitoring.
In underexposed takes, horizontal lines were apparent throughout the image, reminiscent of digital RF interference rather than the more typical random variable pattern noise.
CANON C700 FF
The C700 FF is slightly lighter and slimmer than the Alexa LF, but still too massive for long periods of hand-held operating, especially with the Codex recorder attached.
After being disappointed with the color science of the C300 II, we were looking forward to a new sensor. Unnecessary gamma / gamut / matrix options, already found in the C300 II again required a pre-test. We opted for:
Curve: clog2 (largest dynamic range)
Gamut: cinegamut
Matrix: off (EOS-original for more saturation and compatibility with C300 I)
sharpness: 0 (or -10)
NR: -1
The camera shows increasing amounts of magenta in the skin tones when underexposed, then drifts towards green and loses saturation in the other channels. Low light performance was disappointing. Setup 3 shows sensors smear, which the C300 II also suffers from.
There is a second menu display on the assistant’s side – it is noticeable that manufacturers are aligning themselves with ARRI’s design. Sub-menus are reminiscent of the C300 and the menu structure confusing.
Along with the Venice, the camera has the quickest response time on pressing the record button.
The camera offers dual recording, the position of the CFast slots is not intuitive.
Uncompressed RAW with 5Gbit/s requires large amounts of storage space, but a variety of XF-AVC bit rates up to 910 Mbit/s are also available.
SONY VENICE
User friendly, relatively light-weight and full of options - the Venice is establishing itself as a cheaper and more ergonomic alternative to the Alexa LF. Above-average low light performance is a very interesting feature. Magenta skin tones, typical for Sony, are easily corrected with the new s709-LUT which produces a warmer image overall, possibly too warm for some people’s taste. Its colors remain relatively constant over the whole dynamic range and good color separation is evident, even when underexposed. Variable pattern noise clouded the overall good impression.
The control panel is on the right. As with other high-end Sony cameras, the menu structure emulates ARRI’s style. When changes are made to the project settings the camera reboots without warning. Sony's propriety X-OCN XT codec is more efficient than ARRIRAW and we could detect no visible disadvantages.
Cons: The camera does not perform internal oversampling of smaller pixel dimensions, so it can only record higher frame rates in 1:1 pixel crop modes. At the time of testing, high speed was only available up to 60fps. Since then firmware v4 has become available and offers up to 120fps.
MAVO LF
The low price point is an attractive feature of the Kinefinity range and the Mavo LF is no exception. Good colors and, above all, the second best low-light performance after the Sony A7SII made it stand out, but the dynamic range is not impressive. The wide selection of codecs, which allows for flexible tailor-made workflows, and the low weight and compact form factor make the camera appropriate for a wide variety of applications. Due to the numerous mounts available, including a mount with an integrated electronic ND filter, the camera has a larger variety of lens options than others in the test. On the downside, reliability issues familiar from previous models remain problematic in a professional environment. Extensive testing of the intended workflow, SSDs and monitoring is mandatory.
Overall, the Mavo LF appeared to still be in development. We experienced hardware errors and had intermittent problems turning the camera on because it would not boot up with the HDMI cable plugged in. This was allegedly related to the defective video-out module of our test device. Crashes only occurred during the pre-test.
With high resolution lenses like the Sigma primes, extreme aliasing was visible, rendering the images practically unusable. Until an adequate OLPF becomes available the use of softer optics, filters and ProRes recording could reduce these artefacts.
We did not test the e-ND in the mount adapter (PL or EF). However, we know from previous tests that it is well integrated into the camera, pressing one of the speed dial buttons allows the ND to be adjusted in 0.03ND increments, which are virtually imperceptible. The most transparent position is ND 0.6.
The Kineback-W offers various SDI and XLR input/output options, but was not available for our test.
Based on the IRE level of a gray chart, the signal at 800 ISO was lower than the other cameras in the test. We compensated for this by setting the camera to native ISO 800, but exposing for 500 ISO, 2/3 stops brighter. However, as the test revealed good low light performance but poor highlight rendition, this measure must be questioned.
MEDIA
Of the two SSDs available to us, only one could record cDNG 1:3 without interruption. The official 120 GB kinemag we used was first generation and not authorized for the Mavo LF. Kinefinety offers only 500GB and 1TB models for the camera.
As attractive as standard commercial SSDs appear as a recording medium, it requires research and tests at the desired data rates to ascertain their usability.
CODECS
Of the many different crop modes and frame rate combinations listed in the manual (which was actually for the Terra6k), not all were available. Recording cDNG, the camera constantly stopped and displayed "FLUSH". Only all ProRes 10bit codecs worked reliably. The older Kinemag may have caused this problem.
The sensor is cropped to achieve high frame rates:
S-35 wide screen: 4K @ 100fps
M4/3: 3K @ 150fps
S16: 2K @ 200fps.
No SSD currently available is able to record cDNG 1:3 above 50fps.
HANDLING
A total of eight basic functions such as ISO, Shutter, e-ND, LUT are located on the four directions of the click-wheels on the handle. With a certain amount of practice this allows very quick access to essential settings. The viewfinder zoom function on the handle only works smoothly with ProRes, with cDNG the magnifying glass was hardly usable.
Overall, handling is well thought through for a single operator and more user-friendly than RED cameras, which the design seems to be based on.
However, judging focus and exposure with on-board monitor is tricky, there is no usable waveform display, the zebra-function is illogically implemented and inaccurate, and peaking levels cannot be adjusted.
MENU
The menu structure is clear and logical, with many options for the assignable buttons. Being able to adjust the exposure level of built-in LUTs is a useful feature, but not well described in the menu.
A7SII
The A7SII utilizes internal noise reduction at higher ISO settings which cannot be switched off. In combination with the weak internal 100Mbps XAVC-S codec (8bit 4: 2: 0) this creates a soft image without texture. While the codec can be bypassed by using an external recorder, noise reduction artefacts are embedded in the HDMI signal.
At extreme levels of underexposure random color shifts were observed. This could be an artefact caused by the internal noise reduction threshold reacting to a very weak signal. The exposure levels concerned were well below what one would normally consider useable.
In Setup 3, the new s709 LUT was used for the evaluation and this produced better skin tones.
1s SOURCE MATERIAL
Rechtlicher Hinweis: Material darf nur zur privaten Analyse verwendet und nicht veröffentlicht werden.
The material of the AG DOK-BVK camera test 2019 is property of both associations and may only be downloaded and used for personal analysis and may not be posted on the web or shown anywhere else in original or altered form, if not specifically allowed by the authors of the test.
https://docs.agdok.de/AG_DOK-BVK_CAMERATEST_2019_FULL_FRAME_SETUP_1_DYNAMIC_RANGE_1s.part01.rar
https://docs.agdok.de/AG_DOK-BVK_CAMERATEST_2019_FULL_FRAME_SETUP_1_DYNAMIC_RANGE_1s.part02.rar
https://docs.agdok.de/AG_DOK-BVK_CAMERATEST_2019_FULL_FRAME_SETUP_1_DYNAMIC_RANGE_1s.part03.rar
https://docs.agdok.de/AG_DOK-BVK_CAMERATEST_2019_FULL_FRAME_SETUP_1_DYNAMIC_RANGE_1s.part04.rar
https://docs.agdok.de/AG_DOK-BVK_CAMERATEST_2019_FULL_FRAME_SETUP_1_DYNAMIC_RANGE_1s.part05.rar
https://docs.agdok.de/AG_DOK-BVK_CAMERATEST_2019_FULL_FRAME_SETUP_1_DYNAMIC_RANGE_1s.part06.rar
https://docs.agdok.de/AG_DOK-BVK_CAMERATEST_2019_FULL_FRAME_SETUP_2_available_lowlight_1s.rar
https://docs.agdok.de/AG_DOK-BVK_CAMERATEST_2019_FULL_FRAME_SETUP_3_studio_lowlight_-2-fstops_1s.rar
https://docs.agdok.de/AG_DOK-BVK_CAMERATEST_2019_FULL_FRAME_SETUP_4_highspeed_1s.rar
TEAM
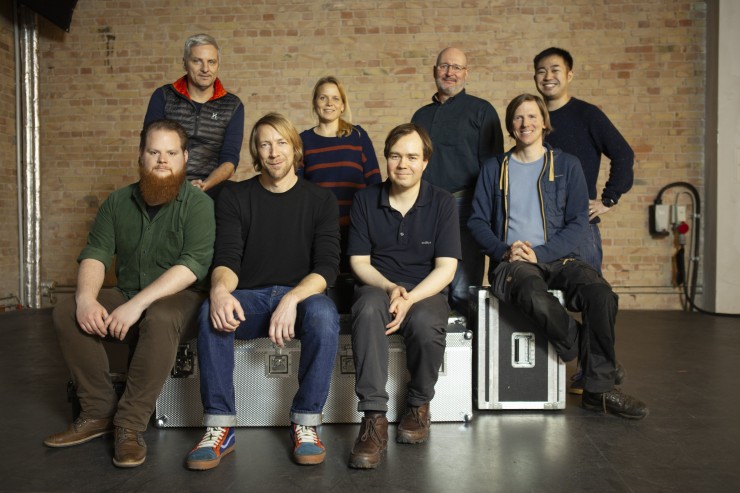
from the left: Jonas Spähinghaus, Gerd Breiter, Erik Wittbusch, Anne Misselwitz, Felix Trolldenier, Christopher Rowe, Rasmus Sievers, Shoichi Sano
The AG DOK test team is always only volunteering and is independent of the manufacturers. However, the model received a salary from the associations.
Discuss with us on Slascam or on Vimeo or contact the test team directly via Email
Bei Presseanfragen wenden Sie sich bitte an:
AG DOK - Arbeitsgemeinschaft Dokumentarfilm e.V.
Mainzer Landstr. 105
D-60329 Frankfurt am Main
Telefon: +49 69 623 700
office@agdok.de